Red Velvet Cake
This cake is so incredibly soft, tender, moist and pairs wonderfully with my tangy and sweet cream cheese frosting. With its wonderful velvety texture and fluffy frosting, you won’t be able to get enough of this irresistible cake.
description
Prep time: 1hr 30min
Cook time: 30min
Total: 2hrs
Serves: 6
Dairy restrictions: contains butter, cream cheese
equipment
6-inch or 9-inch cake pans
Mixing Bowls
Electric hand or stand mixer
Wire cooling rack
Piping bag and tip
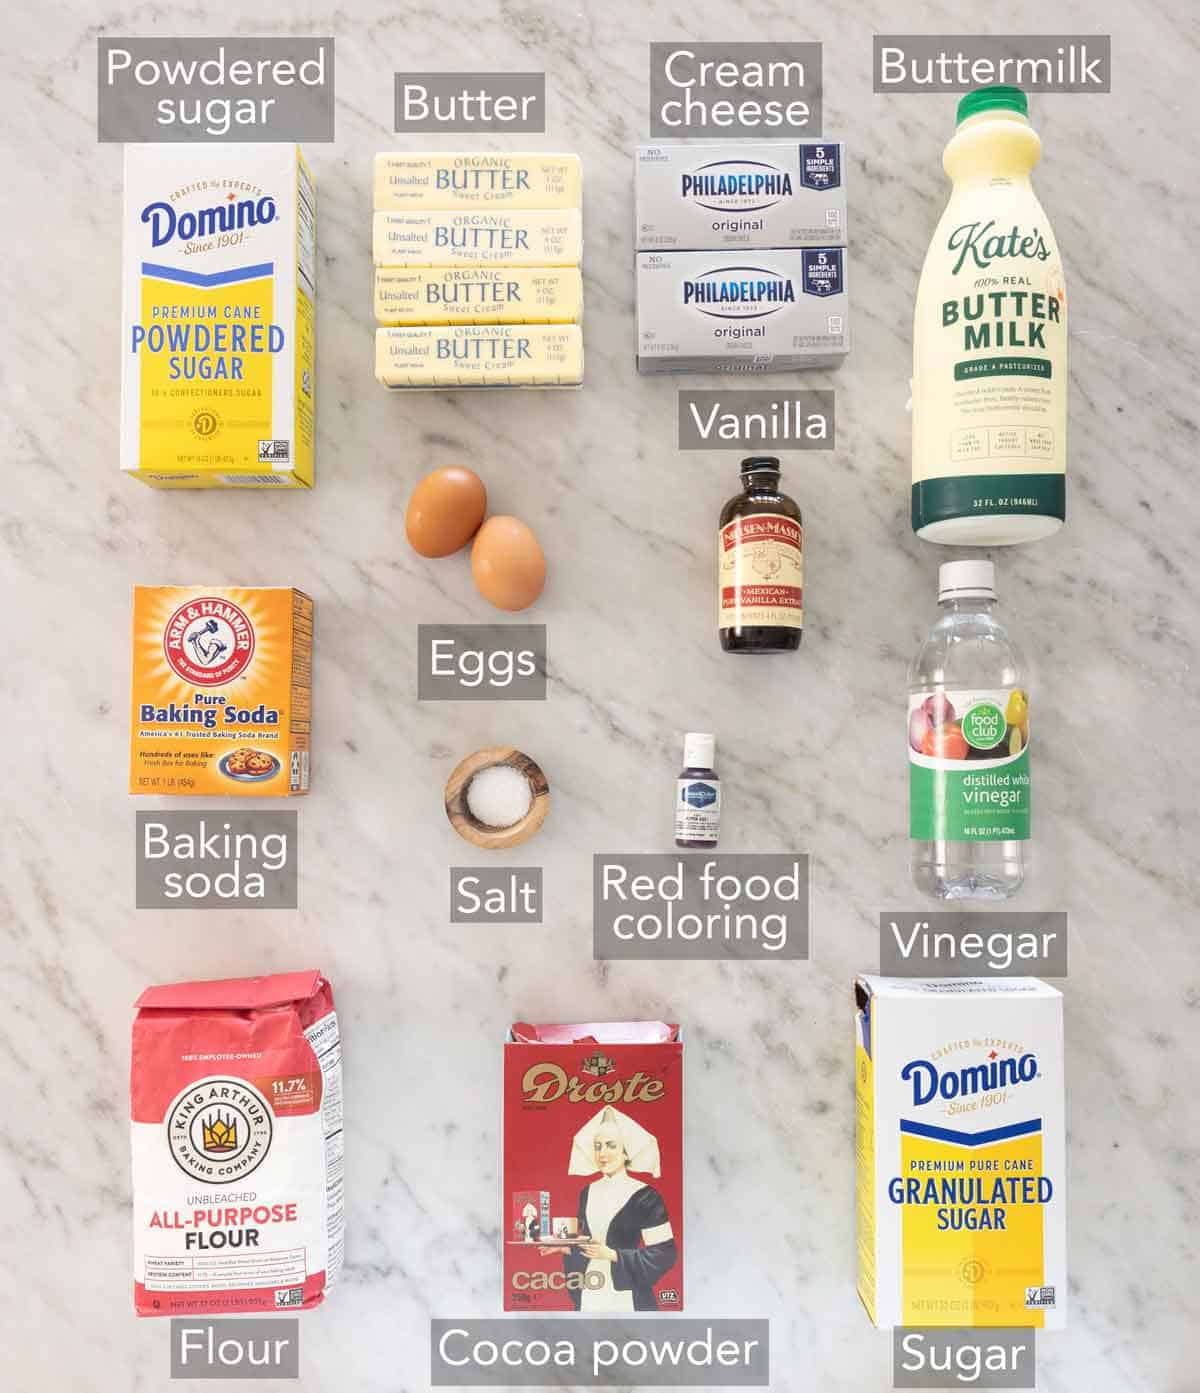
ingredients
cake:
2 ½ cups all-purpose flour (300g)
1 teaspoon salt
1 teaspoon baking soda
½ cup unsalted butter room temperature (113g)
1 ½ cups granulated sugar (300g)
2 large eggs room temperature
2 teaspoons vanilla extract
2 tablespoons cocoa powder
1 cup buttermilk room temperature (240ml)
1 tablespoon white vinegar
1 to 2 tablespoons liquid red food coloring
cream cheese frosting
2 8-ounce blocks cream cheese room temperature (454g)
1 ½ cups unsalted butter room temperature (340g)
1 teaspoon vanilla extract
Pinch kosher salt
1 ½ pounds confectioners sugar sifted (5½ cups/675g)
instructions
cake
Preheat the oven to 350 degrees F. Butter and flour three 6-inch cake pans. (See notes about using two 9-inch cake pans.)
In a medium bowl, sift together the flour, salt, and baking soda.
In a large mixing bowl or the bowl of a stand mixer fitted with a paddle attachment, cream the butter on medium speed. Add in sugar and mix on medium until light and fluffy, about 3 minutes. Add the eggs in one at a time, beating each until well combined. Beat in the vanilla.
Sift the cocoa powder into the butter mixture and beat just until combined. Scrape down the bowl.
In a liquid measuring cup, mix together the buttermilk, vinegar, and red food coloring. (The more you use the brighter the color when baked.)
With the mixer on low speed, add half of the flour mixture followed by half of the buttermilk mixture to the mixing bowl, beating just until combined. Repeat with the remaining flour and buttermilk. Stop and scrape down the bowl occasionally. Divide the batter among the prepared pans.
Bake for about 30 to 35 minutes or until the centers are springy to the touch. When done, let them cool in their pans for about 10 minutes, then turn them out onto a wire rack to cool completely.
cream cheese frosting
In a large mixing bowl or the bowl of a stand mixer fitted with the paddle attachment, beat the butter and cream cheese together on medium speed until smooth and fluffy, about 3 minutes.
Add the vanilla and salt and beat until combined.
Sift the confectioner's sugar into a large bowl.
With the mixer on low speed, gradually put the sugar into the butter mixture until combined. Stop and scrape down the bowl occasionally. Increase speed to medium and beat until fluffy, about 1 minute. Place about a cup of frosting to a piping bag with a decorative tip.
assembly
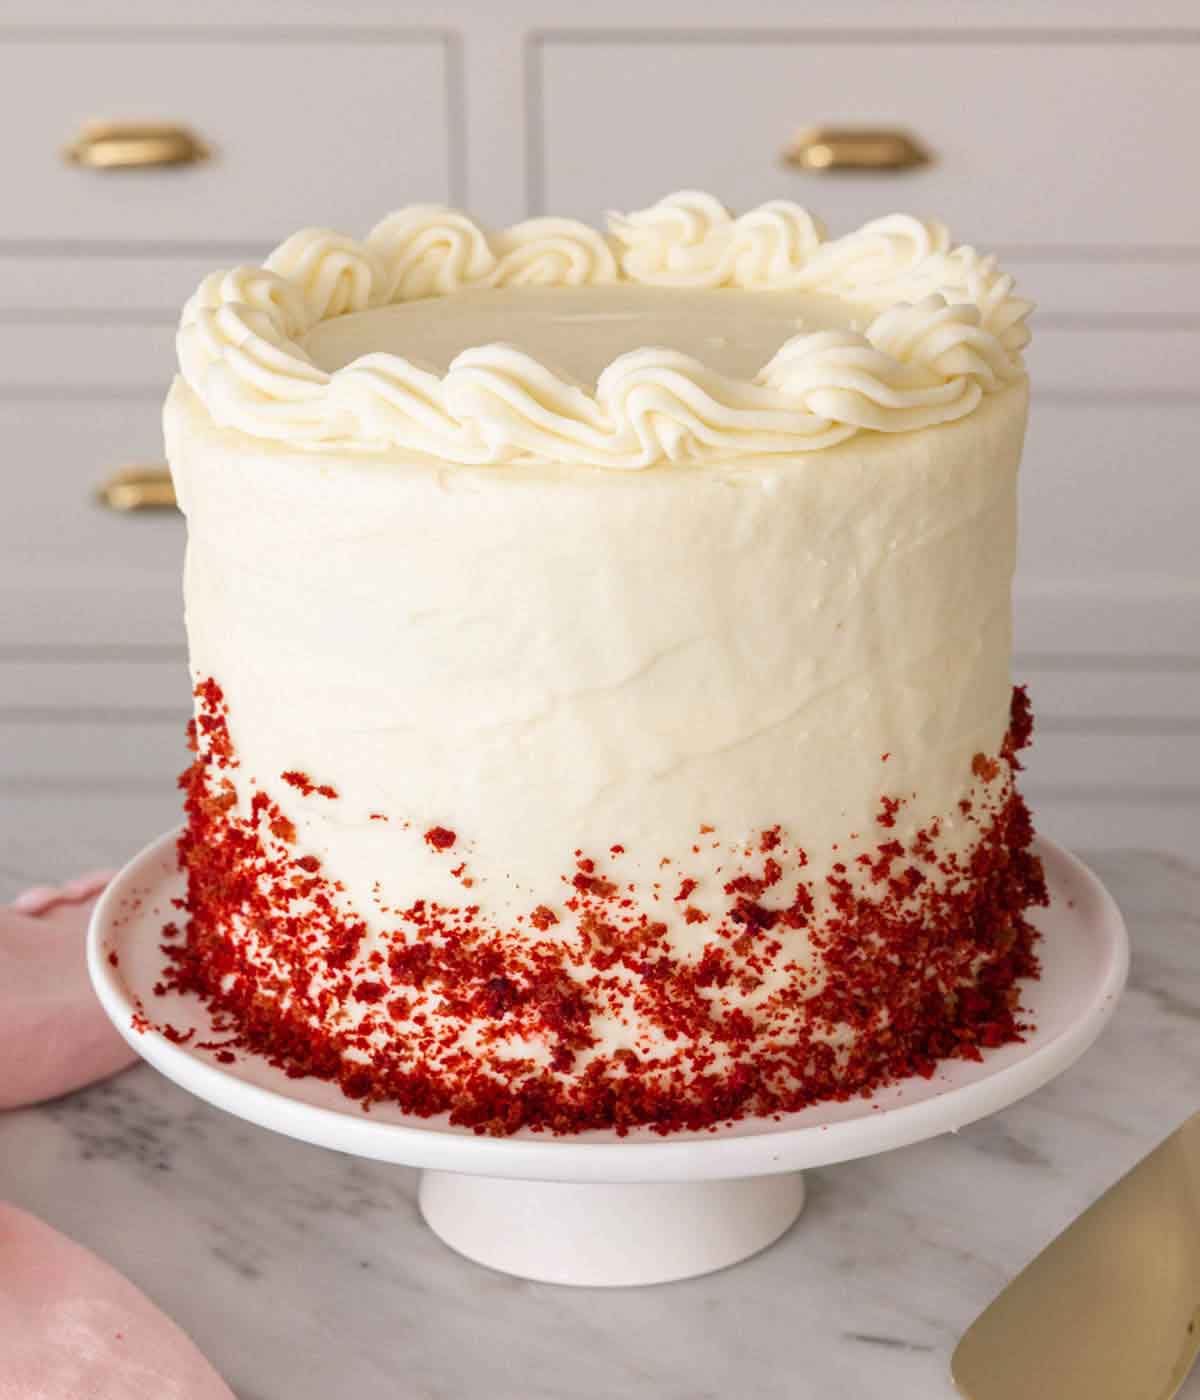
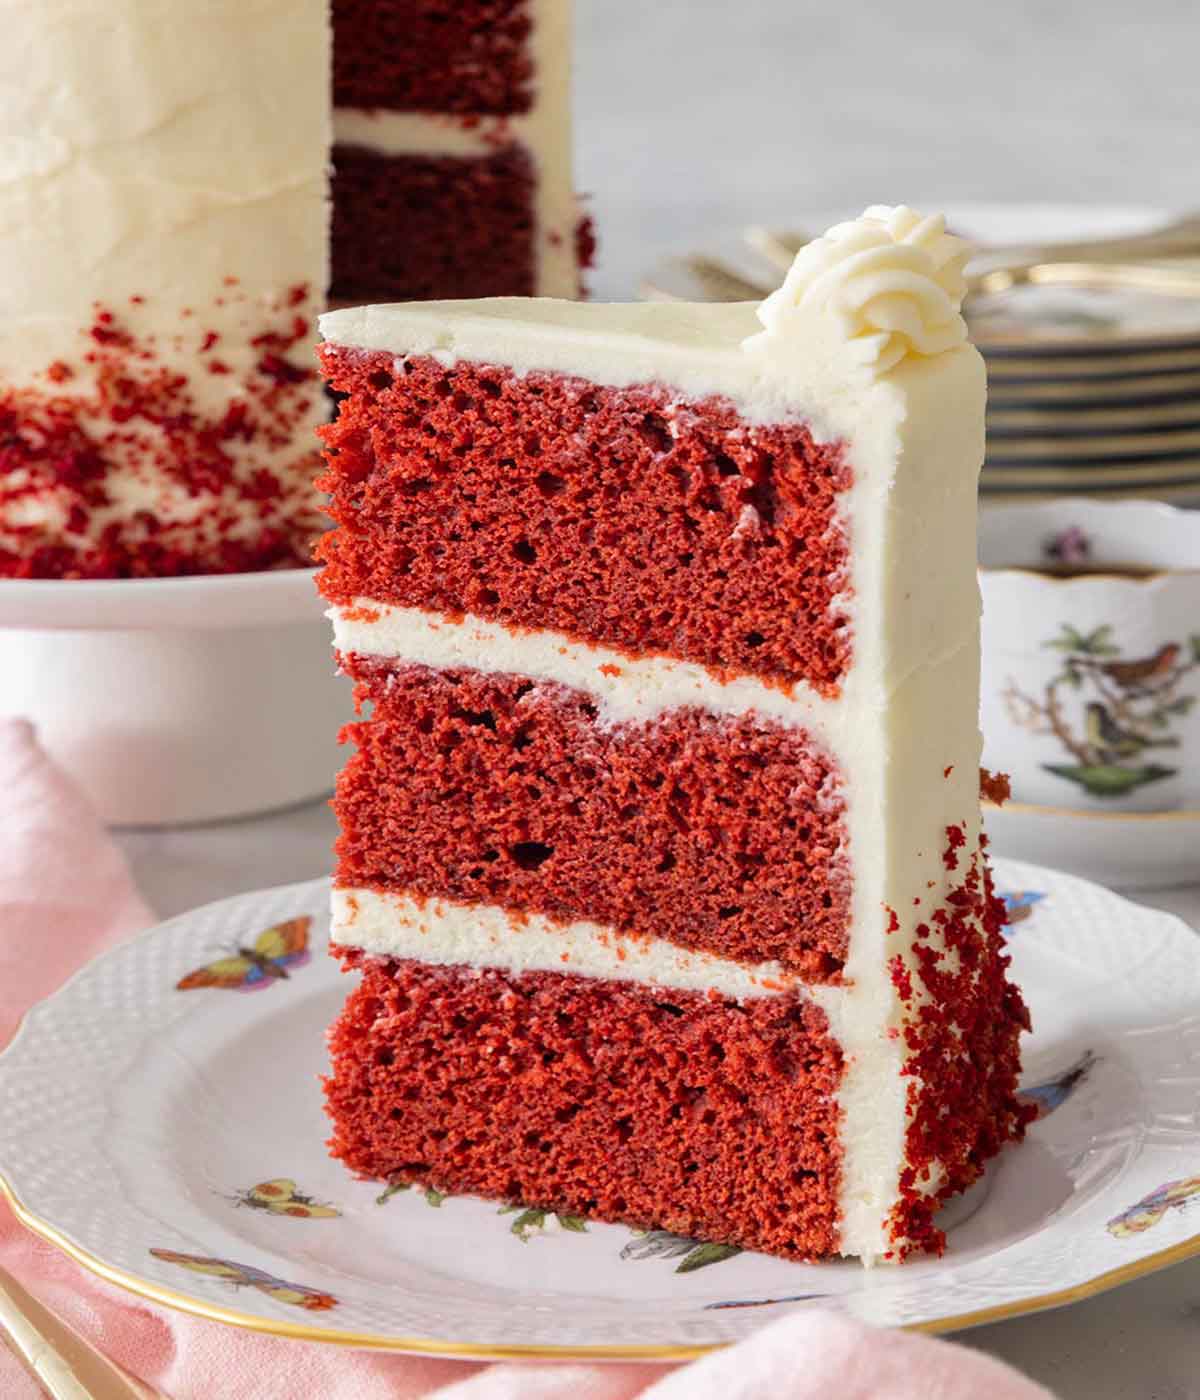
Place a cake layer on a cake stand or serving plate. Spread about ½ cup of frosting on top of the cake. Place another cake layer on top and repeat with the frosting. Top with the final cake layer and spread the remaining frosting all over the top and sides of the cake.
Use a bench scraper or offset spatula to smooth out the cake. Pipe a decorative border on top of the cake or as desired. Chill the cake for about 1 hour or until the frosting is set. Any leftover cake should be covered and can be stored at room temperature for up to 2 days or refrigerated for up to 1 week.
notes
If the tops of your cake layers are domed, use a serrated knife to cut off the top of the domes so you can stack them evenly. Alternatively, use cake strips to help your cake layers come out evenly. Cake strips work by keeping the outside edge of the pan cooler to ensure that the entire cake rises at the same rate, preventing a dome from forming in the middle. If you don’t want to buy cake strips, I have a post on how to DIY cake strips.
I highly recommend using a scale to measure your flour as it’s the most accurate method. If you don’t have a scale, fluff your flour with a spoon and spoon it into your cups before leveling it off with a knife. This method prevents you from overpacking the measuring cup.
If the ingredients were refrigerated, such as the eggs, milk, and cream cheese, it’s best to bring them to room temperature before using them so they mix effortlessly without overmixing.
Be gentle when handling the layers during assembly, as the cake is very tender.
The best way to let your butter come to room temperature is to bring it out of the fridge 1 to 2 hours beforehand and allow it to sit on your kitchen counter. Softening the butter in the microwave will carry the risk of it melting and making the cream cheese frosting runny. To speed up the process of the butter coming to room temperature, you can cube it instead of leaving the sticks whole.
Make sure to sift the dry ingredients to remove any lumps. This will help to keep the cake’s crumb soft and light.
For a large cake, divide the batter among two 9-inch round cake pans. The layers will be a bit thinner, so the bake time will decrease by about 5 minutes.
If you do not have any buttermilk, see my post on how to make buttermilk with only two ingredients.
nutrition
Calories: 1504kcal | Carbohydrates: 212g | Protein: 22g | Fat: 66g | Saturated Fat: 41g | Polyunsaturated Fat: 3g | Monounsaturated Fat: 17g | Trans Fat: 2g | Cholesterol: 238mg | Sodium: 1177mg | Potassium: 392mg | Fiber: 2g | Sugar: 167g | Vitamin A: 2087IU | Calcium: 350mg | Iron: 3mg
images
video
source
Recipe Linkrecipe websites
All RecipesI really like the format, and easy readability- it makes finding the most important information about the recipe, like ingredients, time, etc very simple. It has a very simplistic style, that is not overwhelming with all the information presented. Black text on a white background, with orange highlightes help match the branding and logo.
EpicuriousEpicurious' home page is very elegant, with the search bar the very first thing we notice. It makes it super easy for people who already know what kind of recipe they are looking for, speeding up the process of cooking and recipe-finding. The text on recipe pages, albeit smaller and thinner, are still very easy on the eyes and helps bring a stylish yet graceful vibe.
Sally's Baking AddictionThe website is mostly composed of pinks and pastels, and has an extremely cozy and visually appealing design. A nice interface can go a long way in improving the customer/viewer experience, and I would say that this kind of personalized style is definitely a great example. All the elements are organized nicely, and also easy to find.
non-recipe websites
AppleI particularly enjoy the sleek design of the Apple website, and I hope to emulate some parts of that within my recipe website. Making sure that all the relevant information is posted on top of being visually interesting and aligned is one of my goals.
Panera Bread (St. Louis Bread Co)Panera's website really speaks to me with it's rounded box borders, and modern look. The green all throughout the website really speaks to the overall branding image, and definitely represents Panera. The pictures also look delicious, which I want to make sure are incorporated within my recipe page.
Coda StoryI really like the minimalistic and boxed composition, that focuses the viewer into only a couple of options that prevents them from being overwhelmed with too many articles or information.